SSH Tunnels
1 What is an SSH Tunnel?
Many obsolete internet protocols have become obsolete because they
provided no means for users to encrypt the information they are
sending to the remote computer. Both the authentication information
(for example, login name and password), as well as any sensitive
data are available to anyone who can access the wire through which
the transmission travels. It's not possible to retroactively rewrite
every internet protocol to include encryption, but the protocol known
as ssh (secure shell) provides a means to encrypt communications from
any port on your computer to any port on another computer, effectively
allowing you to get through a firewall on any remote computer on which
you have an account accessible through ssh. The technique is known as
ssh tunnelling or port forwarding, and is very similar to what
are sometimes known as Virtual Private Networks (VPNs).
While we usually think of ports as corresponping to programs running on
remote computers, you can access programs by the same mechanism on a
local computer, through what is known as the loopback device. The important
difference is that the loopback device allows you to access ports on
your own computer without having to go out on the internet. Thus,
unencrypted traffic on the loopback device doesn't pose any security
threat. Suppose we want to access a web server that's behind a firewall
on a computer network that we have remote access to through ssh. An
ssh tunnel chooses a port on the local machine, takes any packets sent
to that port, encrypts them and send thems to a specified remote port on
any computer on the remote network that would be accesible to you through
an ssh connection. When the remote host responds, the ssh tunnel takes the
packets from the remote host, encrypts them, and sends them back through
the tunnel so your computer thinks they're coming from a local port.
The end result is that all of the traffic that would normally blocked by
the firewall travels directly to the remote machine through the ssh
connection, and back to your computer through the same connection.
If you're a Windows user, when you first configured your SSH client, you
checked a box called "Tunnel X11 connections". This (coupled with an
X windows emulator like exceed) allows you to view graphics generated on
a remote computer on your local display. (The equivalent functionality
is provided by the -X flag of the ssh command line program on
Unix/Linux and Mac OSX). Without this tunnel, the SCF's firewall would
prevent you from seeing your graphics output.
2 Using the Class Webserver
For use in the course, I've set up a web server on the machine in my office,
springer.berkeley.edu. We'll be using it later in the course to
develop R programs on the web, but for right now, you can use it to share
work with others, or as a possibly more convenient way to transfer data from
the SCF computer to your own computer. If you'd like to put some information
on the web server, here's how to do it:
- Log into your SCF account, either in the computer lab or remotely.
-
Create a sub-directory in your home directory called public_html .
You only need to do this once. You can use the command
mkdir public_html
to create this directory.
-
Move or copy any files that you want to be accessible on the web server to the
public_html directory. Any directories you create within the
public_html directory will also be available through the web.
(Note: the web server is configured so
that it will not automatically display a list of files in your directory;
you either need to create a page called index.html with links to
the pages, or remember
the exact name of the file that you want to access.
-
Suppose you have put a file called 'hello.html' in your public_html
directory, and that your SCF login id is s133xx. To access the
file from an SCF computer, use the URL:
http://springer.berkelely.edu/~s133xx/hello.html
Everything will work fine if you try to access the page from an SCF
computer, but our firewall will prevent any other computers (including
AirBears connections, and other .berkeley.edu computers) from
accessing the page. This is where the ssh tunnel can be used.
On Windows systems, you can
use putty to
set up the tunnel;
on Unix/Linux or Mac OSX you can use the command line.
To set up an SSH tunnel using putty, open the program,
click on the plus sign to the left of SSH in the left-hand pane,
and click on Tunnels, which will appear under the SSH section.
Fill in the fields as shown in this screenshot:
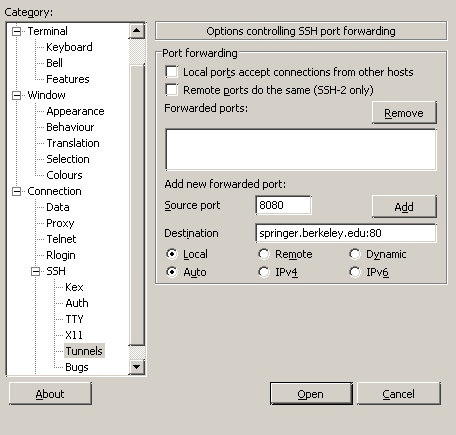 When you've filled out this information, click Add.
Now you can log into any of the SCF computers in the usual way.
At some point,
the SSH program will prompt you to save your new settings. If you say yes,
it will remember the tunneling information so that you won't have to remember
it - next time, when you log into an SCF computer, the tunnel will
automatically be set up. Notice that you must be logged in to an SCF
computer for the tunnel to be activated, even if you won't be using the
shell that comes up when you connect.
Once you've made a connection with the tunnel activated, you need to
refer to port 8080 on your own computer. Following the previous example,
the syntax you'd use to access the page would be:
When you've filled out this information, click Add.
Now you can log into any of the SCF computers in the usual way.
At some point,
the SSH program will prompt you to save your new settings. If you say yes,
it will remember the tunneling information so that you won't have to remember
it - next time, when you log into an SCF computer, the tunnel will
automatically be set up. Notice that you must be logged in to an SCF
computer for the tunnel to be activated, even if you won't be using the
shell that comes up when you connect.
Once you've made a connection with the tunnel activated, you need to
refer to port 8080 on your own computer. Following the previous example,
the syntax you'd use to access the page would be:
http://localhost:8080/~s133xx/hello.html
If you're using a computer that has a command-line version of the ssh
program, you can create the tunnel with the command:
ssh -N -L 8080:springer.berkeley.edu:80 anyscfhost
Where anyscfhost is the name (including the .berkeley.edu
at the end) of any SCF host. The ssh program will prompt you for
a password; once you type it in and hit Enter, you can put the ssh job
in the background using control-Z, or you can just leave it running
it the terminal. Accessing the web server is done in the identical way as
the Windows example.
File translated from
TEX
by
TTH,
version 3.67.
On 25 Feb 2009, 15:19.